A brief demonstration on using your John Deere 316 Lawn Tractor. Leave a comment if you have any questions about anything I didn't cover.
Tuesday, December 27, 2011
Friday, December 23, 2011
Tuesday, December 20, 2011
The DIY Way To Sharpen Lawn Mower Blades
Is your lawn mower tearing of the lawn grass blades instead of cutting it? Does your lawn look like it has been eaten by a goat, in spite of being cut by the lawn mower? Wait; do not pull your hair by the root. Help is at hand. We will teach you how to sharpen the lawn mower blades at minimum price and effort.
Your Manual Lawn Mower - The Faithful Walk Behinds
Tools: The tools that your will require for doing this job are
You and your time of about 2 hours or less
A bastard file of about 12" long
A small crow bar to prevent movement of rotor of lawn mower.
A worktable will be useful for dong the job comfortably.
Procedure: You can use the following procedure as a general guide and make changes to it to suit you. Remember the procedure is not sacrosanct. The results are important, not the procedure.
If possible, remove the handle of lawn mower and place lawn mower on the table.
Secure it if possible in the clamps. If you do not have clamps, do not bother, secure it against any block, so that the movement away from you is restricted.
Fix the crowbar in the blades so that it will not rotate
With the help of the bastard file, file the edges of blades so that they look sharp. Work at an angle of 45 degrees
When one blade is sharpened, remove the crowbar and turn the rotor to work on another blade. Repeat the procedure until all blades are sharpened.
If you have a flexible shaft grinder in your DIY workshop, you will be able to complete the work within 5 to 10 minutes per blade. Make a template of blade profile before you start your work and compare frequently. This is necessary to ensure that you do not over cut at a place.
Safety Tip For You
While sharpening the blades ensure that the stroke is not too long otherwise, you may injure yourself.
Sharpening Blades Of Power Mower
Depending upon the lawn mower the procedure may vary. We have included general statements in this procedure; you would have to change the procedure slightly. Keep the maintenance manual of lawn mower handy if you have one.
Tools required.
Siphon hose and clean container
Heavy work gloves and goggles
Double-cut (medium-rough) flat file
Lumber scrap
Socket wrench set
Rubber mallet*
Bench vise or C clamps
Rotary blade sharpener accessory
Electric drill*
Screwdriver, or 1/4-in. rod or bolt*
Blade balancer
Replacement blade*
* Only if required
The list may look formidable, but tools are generally available with every DIY enthusiast.
Procedure:
The procedure is given for the simple single blade lawn mower, but the same will apply to all types of blades, whether single or double
Wear hand gloves and clean the engine and the gasoline tank from outside
Remove spark plug from the engine
Remove all the fuel from the tank of the gasoline engine. Use the siphon hose so you do not spill gasoline on floor.
Completely empty out the oil from gearbox if you have one
Invert the engine and have access to the blade.
Clamp the engine so it does not move and clean the blade area thoroughly
With help of a box spanner, remove the nut holding the blade. Usually the nut will be unlocked in the reverse to direction of rotation of engine. You may engage the screwdriver in the cooling fan of engine to stop rotation of engine.
If you find that you are using too much force to unlock the nut, put one or two drops of rust removing chemical, and try after 30 minutes
After you remove the blade, clamp it in the bench vise and sharpen it with a file or a grinder. Sharpen only the outer 2 to 3 inches. The area to be sharpened will be known if you see the blade.
Sharpen only to the required extent. Too much sharpening is not necessary. This is not the knife. It works at the speed of the engine
After sharpening, check with your thumb. Be careful not to cut thumb. If you have done sharpening before, or seen some one doing it, you will know what we mean by this.
Balance the blade with help of a small balancing tool on VEE blocks, or even on two foot rulers placed side by side
Refit the blades, refill engine oil and gasoline and test the sharpness of blades on uncut portion of your lawn
Safety tips:
Always use safety goggles and hand gloves when working with power tools.
Be sure to remove the spark plug before starting. Serious accidents can happen if you do not do this.
Thursday, December 15, 2011
Yard Machines 121R 31cc 2-Cycle Gas Powered Cultivator/Tiller
!±8± Yard Machines 121R 31cc 2-Cycle Gas Powered Cultivator/Tiller
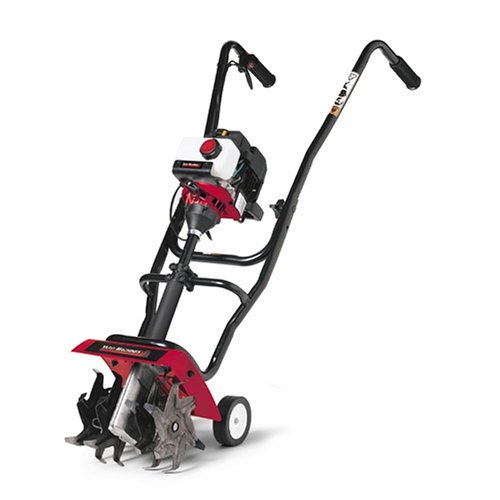
Brand : Yard Machines | Rate :  | Price : $179.00
Post Date : Dec 15, 2011 09:43:00 | Usually ships in 24 hours

| Price : $179.00Post Date : Dec 15, 2011 09:43:00 | Usually ships in 24 hours
- Helps you prepare your garden for planting
- 8-inch tines thoroughly break up soil
- Tines can be adjusted from 6 to 10-1/4 inches wide
- Plow-type handle gives you more control
- Non-CARB Compliant/Not For Sale In California
More Specification..!!
Yard Machines 121R 31cc 2-Cycle Gas Powered Cultivator/Tiller
Sunday, December 11, 2011
Wednesday, December 7, 2011
Troy-Bilt GC720R Trimmer Plus Adjustable Garden Cultivator/Tiller Attachment
!±8±Troy-Bilt GC720R Trimmer Plus Adjustable Garden Cultivator/Tiller Attachment
Brand : Troy-BiltRate :
Price : $89.99
Post Date : Dec 08, 2011 00:15:34
Usually ships in 24 hours

This Troy-Bilt cultivator attaches to Troy-Bilt string trimmers (Item#s 263192, 170546 and 170547) without tools.
Friday, December 2, 2011
Mantis 7225-00-02 2-Cycle Gas-Powered Tiller/Cultivator (CARB Compliant)
!±8± Mantis 7225-00-02 2-Cycle Gas-Powered Tiller/Cultivator (CARB Compliant)
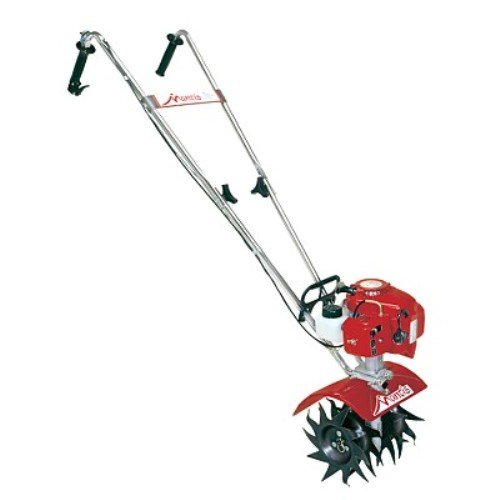
Brand : Mantis | Rate : | Price : $299.99
Post Date : Dec 02, 2011 12:55:08 | Usually ships in 24 hours
| Price : $299.99Post Date : Dec 02, 2011 12:55:08 | Usually ships in 24 hours
- The commercial grade 2-cycle engine is powerful, reliable and utilizes push-button priming for easier starting.
- The compact design allows the tiller to get in tight spaces and be stored where larger tillers cannot go.
- The patented reversible tines can be used to till down 10 inches or shallow cultivate the top 2 to 3 inches of soil.
- 5 Year consumer warranty on entire tiller including engine, plus a lifetime warranty on tines against breakage.
- CARB compliant
More Specification..!!
Mantis 7225-00-02 2-Cycle Gas-Powered Tiller/Cultivator (CARB Compliant)
Adesso Wireless Keyboard Buy Now Surefire Lx2 Immediately Bosch Kitchen Machine Clearance Sale
Tuesday, November 29, 2011
Saturday, November 26, 2011
Wednesday, November 23, 2011
The Fastest Way to Start Your Lawn Mower When It's Been Sitting Idle Since Last Fall
If you're like most home owners who mow their own lawns, you probably find that the first time you go to start your lawn mower in the spring, it is a lot harder to start than it is for the rest of the lawn mowing season. Maybe you get frustrated with it, forget that you aren't a teenager any more, and throw your back out giving the pull-start a furious yank. Maybe you then think to yourself "I wish I had one of those electric start lawn mowers". If you have an electric-start lawn mower, maybe you are thinking "man, this thing has electric start and it still sounds dead. Thank god I don't have one of those manual start models."
By the time you have been trying to start your lawn mower for a few minutes, you have probably tried some with the choke on, and then maybe your "helpful" neighbor came by and told you that you probably flooded the engine. So maybe you try starting it a few times with the throttle opened up a bit and the choke off. If you have a manual-start machine, you may be contemplating your impending chiropractic bill, and wondering whether hiring the neighbor's kid to mow your lawn might not be such a bad idea after all.
So why can it be so hard to start an engine that has been sitting idle for six months? If you examined the spark plug under a microscope, you might figure out the problem. If you look at the tip of the spark plug with your naked eye, it will probably look fine, but if you replace that plug with a brand new clean dry sparkplug, you would probably find that your lawn mower will likely start in seconds.
The key to the mystery lies in something at the microscopic level the happens on the surface of the ceramic insulator of a spark plug over time in a machine that is stored outdoors. As the temperature and the relative humidity cycles, day after day, over time, micro-droplets condense on and re-evaporate from the surface of the ceramic insulator of your spark plug. Each time these micro-droplets form, they rearrange the tiny carbon particles that were deposited on your spark plug the last time you ran your engine. The growing of the droplets as they form pushes those particles together into conductive pathways that wind up providing an alternate path for electrical current (across the surface of the ceramic insulator instead of across the spark gap) when you try to start your lawn mower.
The carbon particles don't quite short things out, but they provide a path whose electrical resistance is low enough so that there is no spark, or the spark has so little energy that it won't ignite the charge in the cylinder. Once the engine starts, the heat of the burns within the calendar clears up this problem in a few minutes, so when you go to start the engine again the next week, it starts fine.
One easy solution for this initial-start problem is to replace the spark plug. Of course, if you want a cheaper solution that doesn't require a trip to the store, I have one for you, and it comes in the form of a hot flame. A propane torch works best, but if you don't happen to have one handy, a butane lighter or a gas stove burner will do. You see, there is a reason that the ceramic insulator surrounding the center electrode of your spark plug is made of the particular material it is made of. The surface properties of that material actually catalyze the burning off of carbon deposits when the ceramic gets hot enough. Of course, when your lawn mower has not yet started, nothing has yet gotten it "hot enough".
To solve this problem, remove the spark plug from your lawn mower, and get a hot clean flame ready (either a propane torch or a butane lighter, or gas burner on a stove). Holding on to the end of the spark plug that usually connects to the spark plug wire, stick the other end (the spark end) of the spark plug into the flame for a few seconds while rotating the spark plug a few times, heating the center electrode and the surrounding ceramic. It only takes a few seconds. After you take the spark plug out of the flame, take a look at the ceramic material surrounding the center electrode.
You should notice that the ceramic insulator surrounding the center electrode of your spark plug is now bright white, where before it might have been off-white or gray. Now your spark plug is as good as new. Put it back in your lawn mower, and enjoy how it roars quickly to life!
Lowest Price Lil Wayne Syrup Cheep Bum Genius Diapers Munchkin Straw Cup Compare
Monday, November 21, 2011
Troy-Bilt TB154 9-Inch 6.5 Amp Electric Garden Cultivator/Tiller
!±8± Troy-Bilt TB154 9-Inch 6.5 Amp Electric Garden Cultivator/Tiller
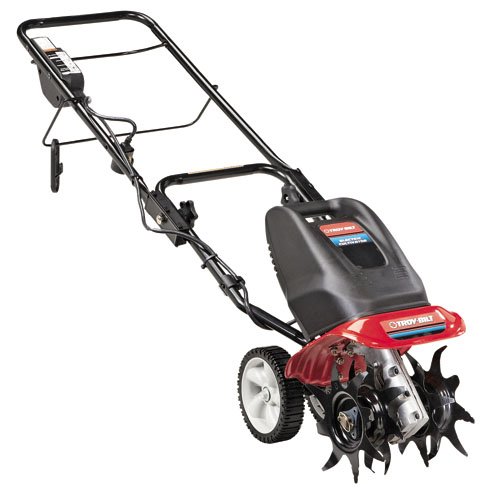
Rate :
| Price : $194.99 | Post Date : Nov 21, 2011 21:57:22Usually ships in 24 hours
10" 6.5-Amp Electric Cultivator
- Yellow Jacket 2885 12/3 Heavy-Duty 15-Amp SJTW Contractor Extension Cord with Lighted Ends, 100-Feet
- Alert Stamping 7000WR Pro-Reel Cord Carrier
- Greenworks 27012 10-Inch 8 Amp Electric Cultivator/Tiller
- Earthwise TC70001 11-Inch 8-1/2 Amp Electric Tiller/Cultivator
- Quick Winder RAP-100 Electric Cord and Fiber Optic Cable Reel
Saturday, November 19, 2011
Cultivate Your Land With Rototillers
Rototillers are considered the most popular piece of equipment favoured by serious gardeners as it can literally lift and aerate the soil according to the specifications of gardening. This cultivator works with rotating discs or tines. The tines are those fork-like implement that can tear up the soil until it can reach the fine granule state. The discs rotate the soil and make it finer. Using one or the other is good enough, but using both can leave your soil super fine and aerated, your seedlings will just have fun digging in to root themselves.
If you are using a garden seeder, the rototillers are your best options as furrowing can be easier and there is not much need to push the seeds into the furrow too much. Also, the weeds would be uprooted so as not to strangle the seedlings as they are trying to establish themselves. If you are really going to use the rototiller a lot of times, then you should think of investing in one, but if you think that you are better off renting one of one time use, then you should do that too. The choice is really yours and it really depends on your needs.
If you really want a rototiller and yet the price is too steep to be able to buy a brand new one, then you can think about getting used tillers instead. However, they may not be up to your expectations as tillers are really much abused equipment and you might just be spending money on a dud. Keep your option open, check out everything before you make a decision.
Like any good equipment, you should think about the weight and the durability as well as the manoeuverability of your rototiller. You must be able to use it with your own body as the basis and not someone stronger than you are. If you are a petite and the equipment is heavy, don't buy it. It might be too much for you and you can get injured forcing the issue.
If you do end up with a rototiller and you may no longer have use for it as now you have seeded and you are just waiting for your plants to grow, maybe you can just rent it out or have your son have a summer job by getting hired out to help in other people's gardens. Simply because you don't need it for the mean time doesn't mean that it can be a liability.
To find out more about rototillers, motorized or manual, try sitting in front of the computer and start browsing. You will be surprised at price differences in some dealerships. You may end up saving money in the future if you get yourself educated about the rototillers.
Shop Casio Vs Yamaha Coupon Waffle Iron Rotating Good Bargain New Balance 6200 Recumbent Bike
Friday, November 18, 2011
Lawn Mower Tire Change Carlisle Tire afflicted on a lawnmower
How to change the tire on your own lawn mower and save $$$ Step by step procedures for removing and replacing a tire on a lawnmower. From the tires valve stem core removal, to replacing the valve stem, to "breaking the bead" on the tire, dismount and remount, We replace the Carlisle tire...
Subscribe to:
Comments (Atom)
|
|
|
|
|
 |
 |
 |
 |
 |
 |
 |
 |